7 Effective Waterfall Photography Tips
Do you know how to shoot waterfalls like a pro from National Geographic magazine? Have you ever wondered how those lucky professional photographers manage to shoot great photos of waterfalls that look like they are in motion? You can also take the better waterfall pictures with using a few simple tips while taking photographs. Here are 7 simple but very effective tips that will help you to take better waterfalls pictures.
Tip 1: Use a Slow Shutter Speed
Use a slow shutter speed is the most important tip for shooting waterfall photos. The slower shutter speed settings making the waterfalls look "professionally" - smooth and silky. The longer the shutter speed you select, the more pronounced the effect will be.
You also have to compensate slow shutter speed by selecting small aperture and because of that you will also get greater depth of field, thereby allowing the maximum amount of focus in your composition.
The slow shutter speed is a very relative term and it depends on the waterfall you are shooting. For big waterfalls with large water volume some times the 1/30 or 1/15 seconds shutter speed is enough. But for small streams with slow water you need to use much longer shutter speed to achieve the same effect - something like 10 seconds end even longer. Experiment and try out various speeds to see what works best for each image.
Please see Shooting Flowing Water section at the bottom of this page for more information on shutter speed.
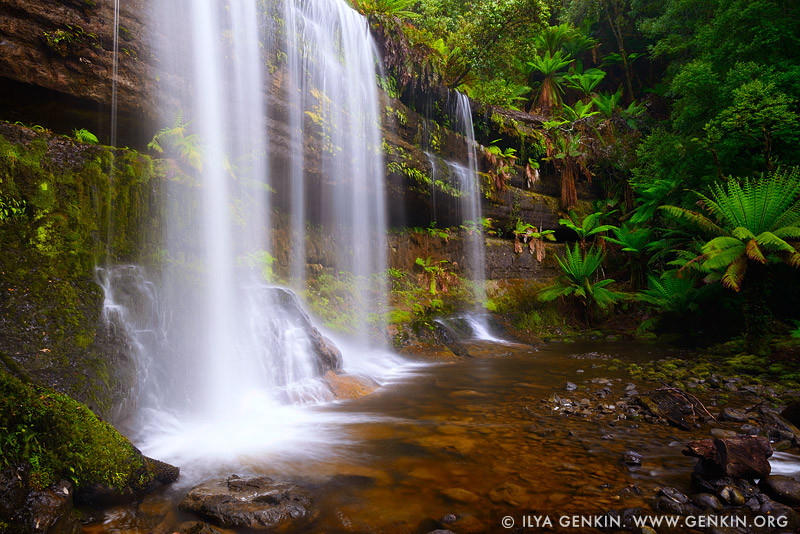
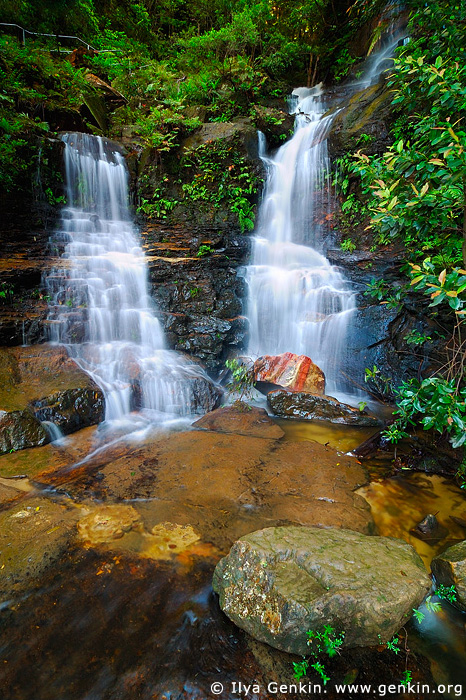
Upper Somersby Falls, Brisbane Water National Park, Central Coast, NSW, Australia
f/11, 3 seconds, ISO 200, ND8 filter
Tip 2: Use a Tripod
Shooting at slow shutter speeds requires that your camera has to be very, very steady - the best way to achieve that is to use a good tripod. Your goal is to blur the movement of the water while everything else remains in sharp focus. Without a tripod you will get a picture where everything is blurred because of the camera shake.
Also when shooting with a tripod use a remote control or shutter release. It eliminates any vibration introduced to your camera when you pressing the shutter button. It doesn't matter if you are using wired or wireless remote control if it's actually doing its job - preventing camera shake when pressing the shutter button.
Another thing that can shake your camera even if you put it onto a heavy-duty and steady tripod is wooden boardwalk in a tourist place or scenic lookouts. Avoid shooting when kids are running around and stamping their feet. Even a small tremble of the ground will blur the image in the same way as if you are handholding the camera.
Tip 3: Use filters
A Neutral Density (ND) filter is very useful for waterfall photography, especially when the scene is too bright. It darkens the image and reduces the amount of light from entering the camera without altering the color or tone of the light, thus decreasing the shutter speeds to accommodate the reduction of light. It can slow down shutter speed up to 3 stops. Usually ND8 filter is enough in most cases.
Circular Polarizer filter is very useful to cut out glare and reflections caused by the sun. It is widely used in landscape photography to darken blue sky, enhance colors and increase contrast. Mostly it's used on sunny days but even on overcast days it will help you to eliminate glare on rocks. A typical Circular Polarizer will slow down shutter speed by 1.5 or 2.5 stops.
You can also stack a ND filter and a Polarizer together to get much slower speed and take off glare at the same time.
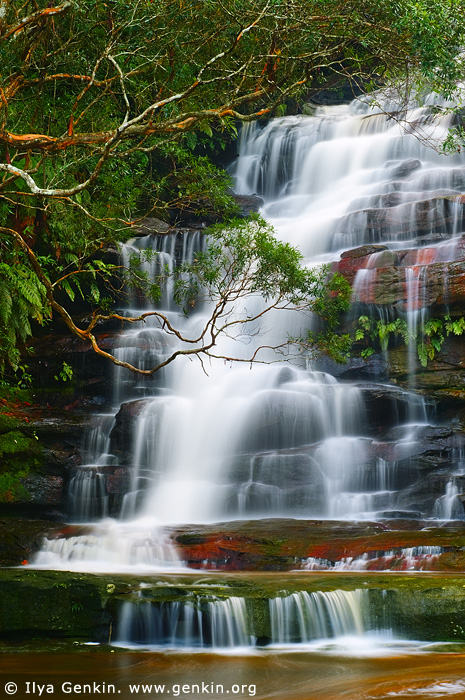
Sylvia Falls, Valley of the Waters, Wentworth Falls, Blue Mountains, NSW, Australia
f/11, 1 second, ISO 200
Tip 4: Right weather
Many waterfalls are found in forest, or in heavily wooded areas. That means the same rules of lighting that apply to forest photography also apply to waterfall photos. Cloudy and overcast days are ideal for photographing waterfalls. This helps make the scene darker and the low light conditions affect exposure by slowing down shutter speed.
Don't shoot waterfall photos in bright light i.e., in the mid-day. Bright light can create high contrast and this will overexposure white water and underexposure dark shadows. It's also difficult to get proper slow shutter speed on bright light even with using ND filters and small aperture.
Early morning or late evening is also a good time for taking such pictures as the Sun has gone behind the trees. Early or late hours will also "remove" tourists I mentioned in the tip 2.
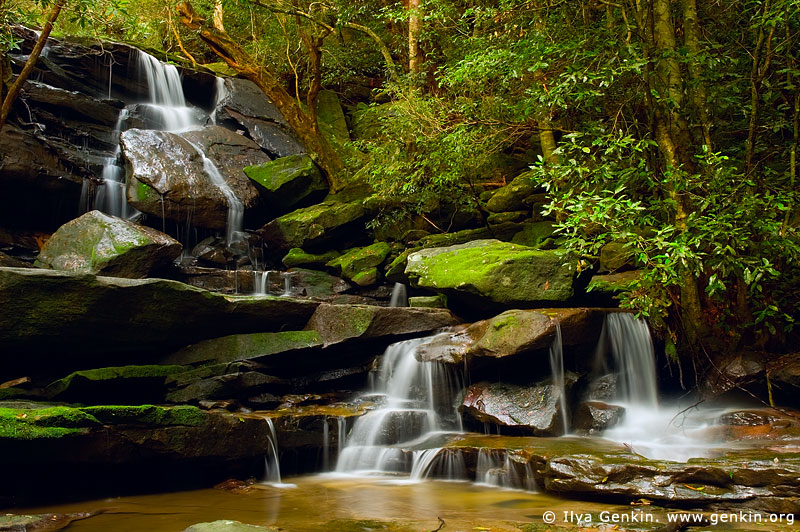
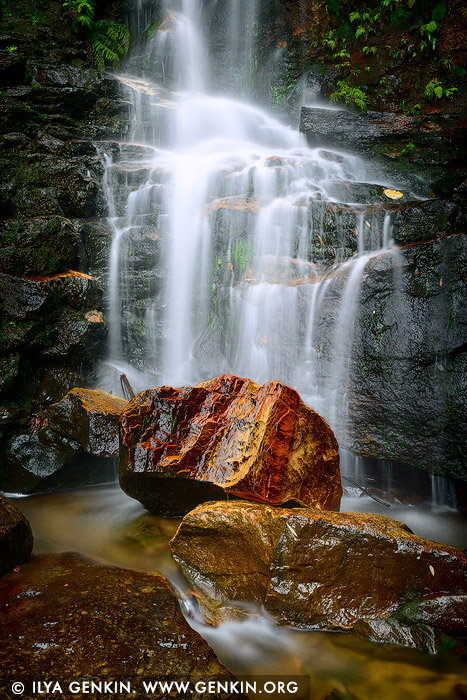
Lower Somersby Falls, Brisbane Water National Park, Central Coast, NSW, Australia
f/11, 6 seconds, ISO 200, ND8 and CPol filters
Tip 5: Right season
Drought or dry season without rains can spoil your photo. Waterfalls that are usually beautiful can be very bored without flowing water. I'm not talking about Victoria Falls on the Zambezi River in southern Africa or Niagara Falls. Such waterfalls always have enough water but small falls can suffer without rains. It's difficult to believe that dry season can dramatically change a powerful waterfall into a small and slow stream.
Tip 6: Composition
You can shoot horizontal or vertical. That depends on the waterfall you are shooting. In most cases a vertical shot will work. If it is a wide waterfall then horizontal shot may work well. Try and include some foreground if you can to create more interest.
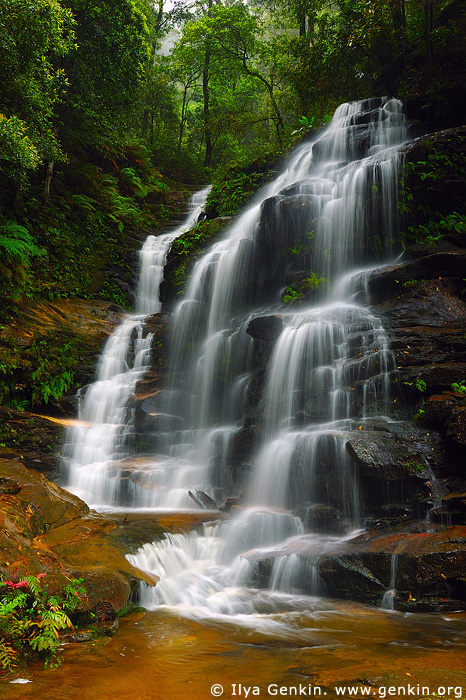
Lodore Falls, Valley of the Waters, Wentworth Falls, Blue Mountains, NSW, Australia
f/11, 1 second, ISO 200
Get closer and look for small parts of the waterfall that make an interesting composition. A group of rocks near the bottom with the water quickly running over them can make as nice a shot as the whole waterfall.
Edith Falls, Valley of the Waters Creek, Blue Mountains, NSW, Australia
ISO 200, f/11, 4 sec, ND8 filter
It doesn't matter what you are shooting - composition is a key factor. So spend some time and read a few good books on composition in photography.
Tip 7: Practice
Practice, practice and practice again. Without practice you will not get better results. The old adage about practice makes perfect applies to photography as well. So, try and try until you get the best pictures.
Good luck with shooting waterfalls!
If you enjoyed this guide, don't miss the full collection of fine art photography in my Forest, Rainforest and Waterfalls Landscape Photo Gallery, where every image is available for purchase as a high-quality print and licensing.
PS. The top photo is Russel Falls, Mt Field National Park, Tasmania, Australia. ISO200, f/16, 5 second.
Shooting Flowing Water
|
Cascades and Waterfalls |
|
| Frozen action | 1⁄125 - 1⁄1000 |
| Velvety effect | 1 sec - 1⁄30 |
|
Streams and Rivers |
|
| Frozen action | 1⁄30 - 1⁄125 |
| Velvety effect | 1 sec - 1⁄15 |
|
Waves and Surf |
|
| Frozen action | 1⁄250 - 1⁄4000 |
| Motion action | 1 sec - 1⁄2 |
| Milky effect | 30 sec - 2 sec |
|
Swirls and Eddies (in rock pools and shallows) |
|
| Frozen action | 1⁄30 - 1⁄125 |
| Motion effect | 10 sec - 2 sec |
The most common way to capture moving water is to use slow shutter speed so that it records as a graceful blur. The effect mainly depends on how fast the water flows and how long you expose it for and that will greatly vary both the look and feel of the scene to potential viewers. To record waves on a rocky shore, 1/2 to one second is ideal as it records the motion of water, whereas an exposure of several seconds loses this effect and water appears as a milk which also is very beautiful. To enhance the effect of blurred water, include objects such as rocks or boulders in the frame. Although blurry or milky water looks great, it may not always be the best option and in some situations you may decide to freeze it instead. Pictures of a huge waves crashing over a sea wall or against a rock shore with water exploding into the air, tend to look more effective if water is frozen, and to do that you will need a fast shutter speed. A shutter speed of 1/500 of a second or faster will help you to freeze the water's motion in that case.
Choosing the right shutter speed is key to great wave images. The longer the shutter speed, the smoother and more blurred the water will be. The blur also depends on the water flowing speed: the faster it is flowing, the smoother the water will be. Small creeks and slow rivers require longer shutter speed to capture the blur than high speed waves on rough ocean. The closer to water you are the shorter shutter speed could be. For more distant shots you'll need a longer shutter speed to record flowing water as a blur.
You may not get the shot exactly right first time: water and especially the sea never behaves exactly the same way twice. Instead take plenty of shots, and experiment with your shutter speeds.
Samples and Definitions

Velvety effect for waterfalls and rivers generally described as soft, dreamlike blurs of the water's movement where you still can see "threads" of water.

Motion effect for waves and surf is very similar to velvety effect for waterfalls where waves and foam produces visible flow of the water. Still very soft and silky.

Milky effect - very long exposure completely blurred water's movement so it appears as milk. No separate waves or motion cannot be seen.

Motion effect for swirls is the same as Motion effect for waves and surf, but requires longer exposure due to slow water flow.
About the Artist
I'm Ilya Genkin - an internationally recognised Australian landscape and fine art photographer offering wall art prints. My passion for capturing the beauty of nature and our world translates into striking photographic prints that bring life, emotion, and inspiration to any space. From tranquil seascapes to dramatic mountainscapes, each image is a reflection of my vision and dedication to the art of photography.
Read more about Ilya Genkin and shop fine art prints online from his collection.
Wall Art Prints Featuring Fine Art Landscape Photography
Explore my extensive collection of wall art prints - crafted with the highest-quality materials to suit every style and budget. Whether you're looking for a luxurious, ready-to-hang piece or a beautifully printed work to frame yourself, each photograph is available in several premium formats: Gallery-quality Fine Art Paper Prints - ready for framing, and Professional Canvas Prints - classic and timeless texture.
Each artwork is meticulously printed and made-to-order to ensure you receive a piece that elevates your home, office, or commercial space. Buy fine art prints online to suit your style.
Artworks for Interior Designers, Home Stylists, and Architects
I collaborate with interior designers, home stylists, and architects to create bespoke wall art prints tailored to your project's aesthetic, colour palette and interior design needs. Prints can be customised and sized to complement your space perfectly. All pieces are made-to-order, and pricing varies based on size, quantity, and shipping.
Contact me to discuss your project and request a personalised quote.
Why Choose Ilya Genkin Photography?
By choosing my work, you're not just acquiring exceptional art - you're supporting an independent Australian artist and contributing to a vibrant local creative community. Every purchase directly helps sustain and grow this craft, bringing authentic and meaningful art into your life.
Request a free mockup to see how a chosen photograph will look in your space before you buy.
Start your journey today - shop our wall art collection, purchase with confidence, or order custom prints today and transform your walls with fine art photography.
Fine Art Landscape Photography
Information
- FAQ - Landscape Photography Prints
- Purchase Fine Art Prints
- Black and White Fine Art Prints
- Art Consultation for Your Home
- Design Tips for Styling Your Space with Art
- Limited Edition vs Open Edition Prints
- Collector Resources
- FAQ - Image Licensing
- License Stock Photos
- Stock Photo Price Request
- Materials and Sustainability
Photography Guides
Online Store Opens 24/7
Email:
Phone: +61 (0) 421 055 613

Crafted with care for the planet - using sustainable materials and eco-friendly packaging.
Ilya Genkin Photography acknowledges the Traditional Custodians of the land on which we operate, live and gather as employees, and recognise their continuing connection to land, water and community. We pay respect to Elders past, present and emerging.