12 Tips for Seascape and Coastal Photography
Have you looked at a seascape photo and wondered how to create that misty water effect or capture stunning sunrise? Here you'll find seascape and coastal photography tips and tricks used by professionals for taking stylish and artistic landscape pictures that stand out from amongst the crowd. These tips will help you take great digital photos that go well beyond the typical snapshot.
Tip 1: Research and study the location before shooting
Do your "homework" and research Internet - use Flickr, Panoramio and Google Image Search. Drop in to a tourist information centre and read tourist brochures, books and magazines to find a nice location. Have a look at postcards, calendars, and booklets. Study maps and locations to get an appreciation of the environment your photographing before hand. Find a good spot. Identify interesting subjects and spots and decide whether sunrise or sunset light would work best. If you want to shoot at sunrise then try to visit the location the day before to get familiar with the location. Even better if you visit the location a couple of times at low tide and high tide as well (see tip 8 below).
Tip 2: Shoot around sunrise and sunset
The best time to photograph seascapes is around sunrise and sunset. Some people prefer to shoot right after sunrise and right before sunset. There is approximately 15 - 30 minutes of exceptional light after sunrise and before sunset. This time sometimes known as "Golden Hours" or "Magic Hours". The warm color of the low sun is often considered desirable to enhance the colours of the scene. Also low angle sun rays reveal rock shapes and textures. However some people prefer to shoot in twilight - before sunrise and after sunset. Depending on a location it could be 1 hour to 30 minutes before sunrise when you can start shooting. Check sunrise/sunset, nautical and civil twilight and tide times for the location you want to photograph. Usually nautical twilight is about 1 hour from sunrise/sunset and civil twilight is about 30 minutes from sunrise/sunset. Check distance and travel time to the location and plan to arrive at the destination at least 0.5 hour prior to sunrise or sunset. One hour before sunrise or sunset is even better. So arrive early and stay late. This advice should be mandatory for any landscape photographer.
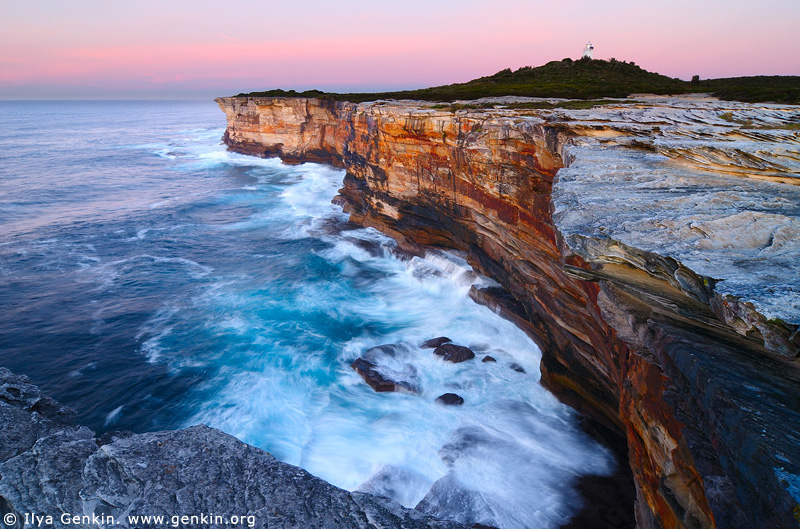
Sunrise at Cape Bailey, Kurnell Peninsula, Botany Bay National Park, Sydney, NSW, Australia
f/11, 3 seconds, ISO 200
Tip 3: Equipment for seascape photography
Having proper equipment is very important for landscape and seascape photography. The list of essential items:
- Camera
- Lenses - depending on a location and subject it could be any lens from wide-angle to telephoto, but usually a wide-angle lens is an ideal lens for the majority of seascape photography.
- Lens Hood (to eliminate glare)
- Remote Control / Cable Release
- UV Filter to protect you lens from splashes and salt. It's much easier to clean dried salt from a removable filter than from a front element of the lens.
- Filters (see tip 4 below)
- Sturdy tripod and tripod head. A tripod is always essential when working with water, whether you want to freeze it in motion, or want to smooth it out with a long exposure.
- Extra camera battery as the long exposures drain batteries very quickly. Remember, extra batteries will, eventually, save the day.
- Bubble level to level the horizon.
- Small headlamp or torch to illuminate camera dials and find something in your backpack.
- A strong flashlight to illuminate foreground subject so that you can compose the shot and/or focus properly.
- A towel, lens cleaning cloths, lens cleaning solution. Even if there is no wind your lens and filters start to get coated in salt. Salt crystals seriously affect image quality and could easily damage your lens or filter. Keep an eye on this and clean your glass regularly. Apply lens cleaning solution and try not to scratch the lenses with dry salt crystals.
- Rain cover. Hint: You can use free shower cap from a hotel room to cover your camera. It allows you to setup and focus camera without removing it. When you need to shot then just remove it from the lens, make a shot and put it back. It saves your lens from salt and splashes.
Tip 4: Filters for seascape photography
Polarizing, neutral density (ND) and graduated neutral density (GND) filters are essential in landscape and coastal photography.
Polarizer filter not only darken the sky on a sunny day but also saturates colors by cutting through glare and reflections. By rotating the filter you'll see reflections disappear, a general increase in color saturation and darkening of blue skies. The last effect is one of the most useful for shooting landscapes during the day, as it increases the contrast between the sky and the clouds, giving it more impact. The effect is most pronounced on areas of the sky at 90 degree to the sun, with other areas showing less darkening. Polarizer filter also adds about 1 or 2 stops to the exposure if you want to blur water motion.
Neutral Density (ND) filters simply reduce the amount of light reaching the lens, allowing you to shoot at slower shutter speeds. It doesn't have any effect on the color, tone or saturation of your image, but this simplicity adds to its usefulness. Using slow shutter speeds in bright conditions you can easily blur water and waves and capture movement in the sky. The long shutter speed gives the clouds a chance to move through the shot, and the water becomes a mist with enough sea state. NDs come in varying strength, from 1-stop till 10-stops. ND filters are also very useful when shooting waterfalls.
Graduated Neutral Density filters allow you to control the brightness between the sky and dark foreground areas. Without filter if you expose for the sky the foreground will be dark, with little or no details, while exposing for the foreground will make the sky far too light, loosing the colors that you got out so earlier for. A graduated ND filter simply darkens the sky to allow you to get details in both areas so when you expose for the landscape you can record the sky as it appears to the naked eye. Grad NDs come in varying strength. ND filters are given a series of numbers - 0.3 (1-stop), 0.6 (2-stops) and 0.9 (3-stops). The GND 0.9 (3-stops) Hard Edge and GND 0.6 (2-stops) Soft Edge filters are probably most useful when shooting seascapes.
Reverse Graduated Neutral Density filters. Reverse GNDs are quite unique filters from Singh-Ray, Hitech and a couple of other brands. Like all graduated filters, they are clear at the bottom, however at their horizontal middle started very abruptly with either a 1, 2 or 3 stops of neutral density and then graduate to 1 or 2 stops towards the top of the filter.

Tip 5: Maximize your Depth of Field
The normal approach to landscape and seascape photography is to ensure that your scene is in focus as much as possible. To achieve that just use small apertures (between f/8 and f/16) for sharpness (depth-of-field or DOF) that spans the entire picture field. But also try to avoid using apertures smaller than f/16 unless there is a need for them (especially on digital cameras) as your images will be affected by diffraction. Later you can always experiment with very shallow depth of field.
Tip 6: Use a strong foreground
Sometimes it's really difficult to find anything on a beach except water and sand. That could lead to really boring images. So try to include something in the foreground. It could be rocks, a tree, a log, shells or something that can add the depth to the image. But also try keep the center of interest away from the central area of the frame following the basic rule of composition - The Rule of Thirds. Unless you are deliberately trying to create a near-far compositions with a foreground element centered at the bottom of the image.
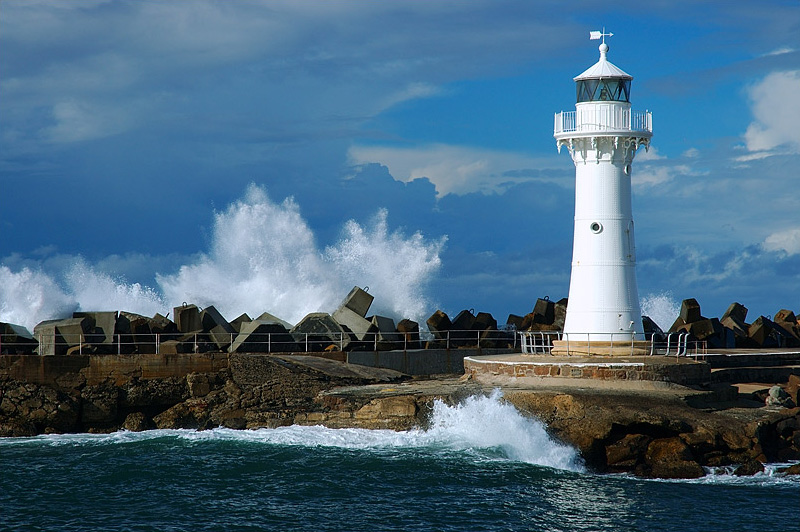
The Wollongong Breakwater Lighthouse, The Lighthouse at Wollongong Harbour, Wollongong, NSW, Australia
f/11, 1/160 seconds, ISO 200
Tip 7: Play with Shutter Speeds
The most common way to capture moving water is to use slow shutter speed so that it records as a graceful blur. The effect mainly depends on how fast the water flows and how long you expose it for and that will greatly vary both the look and feel of the scene to potential viewers. To record waves on a rocky shore, 1/2 to one second is ideal as it records the motion of water, whereas an exposure of several seconds loses this effect and water appears as a milk which also is very beautiful. To enhance the effect of blurred water, include objects such as rocks or boulders in the frame. Although blurry or milky water looks great, it may not always be the best option and in some situations you may decide to freeze it instead. Pictures of a huge waves crashing over a sea wall or against a rock shore with water exploding into the air, tend to look more effective if water is frozen, and to do that you will need a fast shutter speed. A shutter speed of 1/500 of a second or faster will help you to freeze the water's motion in that case.
Please see Shooting Flowing Water section at the bottom of this page for more information on shutter speed.
Tip 8: Tide
At high and low tides different parts of the coast are covered or exposed. Some locations work best at low tide, while other locations work at high tide. High tide smooths and cleans a beach and covers rocks. Low tide can reveal a bounty of interest: rock pools, shells, seaweed. So check your local tide times to see when this is happening and familiarise yourself with the location before shooting.
Tip 9: What to shoot?
Coasts and beaches offer a wide range of subjects to photograph. Here are a few of them: beaches, coves, harbours, boats and yachts, piers, cliffs, wet rocks and pebbles, rock pools, clouds, reflections, patterns in sand and rocks, waves, wave movement and cascading water, waves crashing over rocks, different close-ups and details, algae/moss, seaweed, marine life and birds.
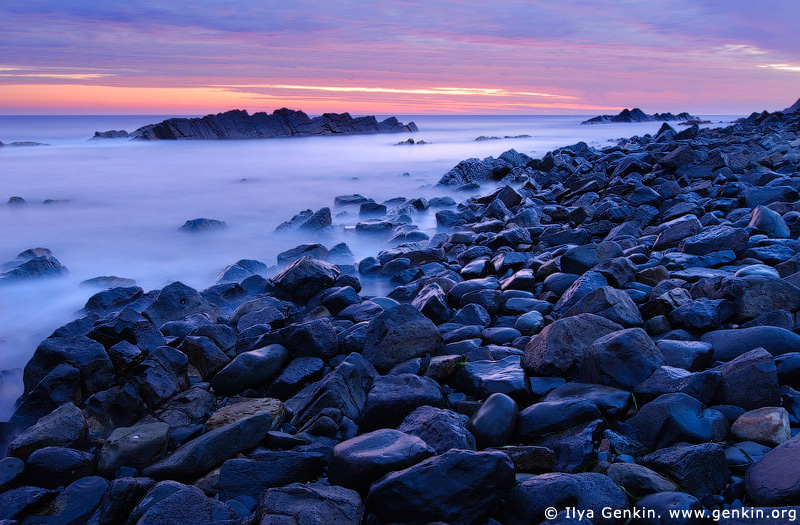
Sunrise at Pebbly Beach, Forster, NSW, Australia
f/8, 125 seconds, ISO 200, Grad ND 0.9 Hard Edge filter
Tip 10: Dress appropriately
Dress appropriately for the weather conditions and time of the year. Have a light weather-proof and fleece jackets as it could be cold and windy even in Summer. If weather allows then wear shorts but not jeans or other heavy long pants. When shooting at the beach and on the rocks, it's very easy to get wet, so have a good pair of comfortable walking shoes with enclosed toes that can be wet, and which will provide good grip and protection on slippery rocks.
Tip 11: Don't be afraid to get wet
Sometimes you need to get wet and stand in water with your tripod in order to get the most dramatic composition. Take some time and try to find a more interesting point of view to shoot from. Explore the environment and experiment with different view points (e.g. get the tripod down low) and you could find something truly unique. Unfortunately waves can move sand and the tripod during long exposures. To prevent this push the tripod legs as deep into the sand as possible before an incoming wave arrives. This helps herden the tripod and camera sufficiently to get sharp images. Wash your tripod legs in fresh water after a seascapes session to remove salt and sand and prevent corrosion.

Sunrise at Bungan Beach, Sydney, NSW, Australia
f/11, 5 seconds, ISO 100
Tip 12: Safety first
Some coasts can be dangerous places at high tide or in a bad weather so check weather and tide forecasts. Always keep an eye on the tide and the waves and never turn your back on a wave. Even a slippery surface could damage your gear or much worse. As photographers' saying goes: "Bad weather means good photos", but if the weather looks really bad then it is best not to shoot. Always make sure that you have an escape route, and give yourself plenty of time to get back to safety when the tide turns. Also it's a good idea to tell someone where you are going. Have a good flashlight (see tip 3 above) for navigation in the dark. Headlamp is better as it keeps your hands free.
Tip 13: Have Fun!
Yes, it's actually 13 tips. This one is just a bonus.
The most important thing is that you enjoy yourself, so have fun while developing your photographic skills.
If you enjoyed this guide, don't miss the full collection of fine art photography in my Beaches, Oceans and Seascapes Photo Gallery, where every image is available for purchase as a high-quality print and licensing.
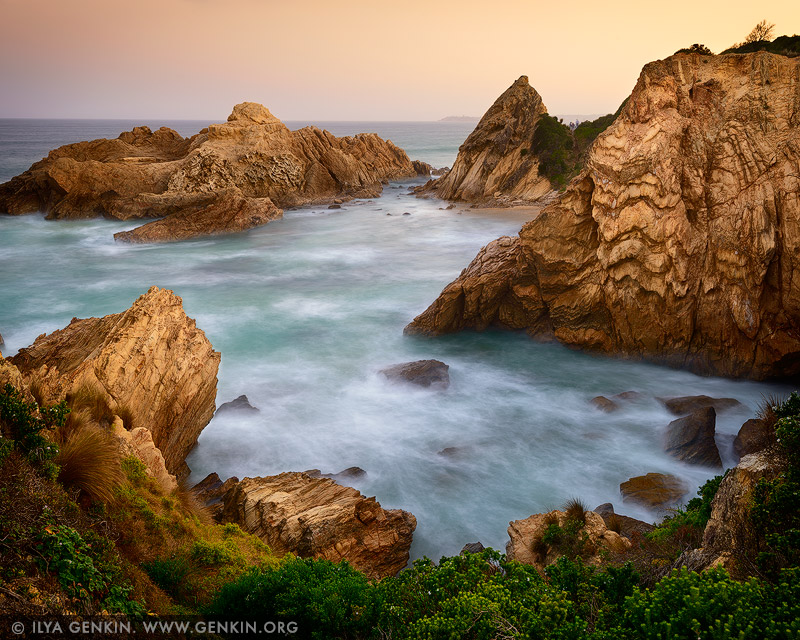
PS. The top photo is Sunset at Murunna Point, Bermagui, South Coast, NSW, Australia. ISO 50, f/11, 4 second, ND8 filter.
Shooting Flowing Water
|
Cascades and Waterfalls |
|
| Frozen action | 1⁄125 - 1⁄1000 |
| Velvety effect | 1 sec - 1⁄30 |
|
Streams and Rivers |
|
| Frozen action | 1⁄30 - 1⁄125 |
| Velvety effect | 1 sec - 1⁄15 |
|
Waves and Surf |
|
| Frozen action | 1⁄250 - 1⁄4000 |
| Motion action | 1 sec - 1⁄2 |
| Milky effect | 30 sec - 2 sec |
|
Swirls and Eddies (in rock pools and shallows) |
|
| Frozen action | 1⁄30 - 1⁄125 |
| Motion effect | 10 sec - 2 sec |
The most common way to capture moving water is to use slow shutter speed so that it records as a graceful blur. The effect mainly depends on how fast the water flows and how long you expose it for and that will greatly vary both the look and feel of the scene to potential viewers. To record waves on a rocky shore, 1/2 to one second is ideal as it records the motion of water, whereas an exposure of several seconds loses this effect and water appears as a milk which also is very beautiful. To enhance the effect of blurred water, include objects such as rocks or boulders in the frame. Although blurry or milky water looks great, it may not always be the best option and in some situations you may decide to freeze it instead. Pictures of a huge waves crashing over a sea wall or against a rock shore with water exploding into the air, tend to look more effective if water is frozen, and to do that you will need a fast shutter speed. A shutter speed of 1/500 of a second or faster will help you to freeze the water's motion in that case.
Choosing the right shutter speed is key to great wave images. The longer the shutter speed, the smoother and more blurred the water will be. The blur also depends on the water flowing speed: the faster it is flowing, the smoother the water will be. Small creeks and slow rivers require longer shutter speed to capture the blur than high speed waves on rough ocean. The closer to water you are the shorter shutter speed could be. For more distant shots you'll need a longer shutter speed to record flowing water as a blur.
You may not get the shot exactly right first time: water and especially the sea never behaves exactly the same way twice. Instead take plenty of shots, and experiment with your shutter speeds.
Samples and Definitions

Velvety effect for waterfalls and rivers generally described as soft, dreamlike blurs of the water's movement where you still can see "threads" of water.

Motion effect for waves and surf is very similar to velvety effect for waterfalls where waves and foam produces visible flow of the water. Still very soft and silky.

Milky effect - very long exposure completely blurred water's movement so it appears as milk. No separate waves or motion cannot be seen.

Motion effect for swirls is the same as Motion effect for waves and surf, but requires longer exposure due to slow water flow.
About the Artist
I'm Ilya Genkin - an internationally recognised Australian landscape and fine art photographer offering wall art prints. My passion for capturing the beauty of nature and our world translates into striking photographic prints that bring life, emotion, and inspiration to any space. From tranquil seascapes to dramatic mountainscapes, each image is a reflection of my vision and dedication to the art of photography.
Read more about Ilya Genkin and shop fine art prints online from his collection.
Wall Art Prints Featuring Fine Art Landscape Photography
Explore my extensive collection of wall art prints - crafted with the highest-quality materials to suit every style and budget. Whether you're looking for a luxurious, ready-to-hang piece or a beautifully printed work to frame yourself, each photograph is available in several premium formats: Gallery-quality Fine Art Paper Prints - ready for framing, and Professional Canvas Prints - classic and timeless texture.
Each artwork is meticulously printed and made-to-order to ensure you receive a piece that elevates your home, office, or commercial space. Buy fine art prints online to suit your style.
Artworks for Interior Designers, Home Stylists, and Architects
I collaborate with interior designers, home stylists, and architects to create bespoke wall art prints tailored to your project's aesthetic, colour palette and interior design needs. Prints can be customised and sized to complement your space perfectly. All pieces are made-to-order, and pricing varies based on size, quantity, and shipping.
Contact me to discuss your project and request a personalised quote.
Why Choose Ilya Genkin Photography?
By choosing my work, you're not just acquiring exceptional art - you're supporting an independent Australian artist and contributing to a vibrant local creative community. Every purchase directly helps sustain and grow this craft, bringing authentic and meaningful art into your life.
Request a free mockup to see how a chosen photograph will look in your space before you buy.
Start your journey today - shop our wall art collection, purchase with confidence, or order custom prints today and transform your walls with fine art photography.
Fine Art Landscape Photography
Information
- FAQ - Landscape Photography Prints
- Purchase Fine Art Prints
- Black and White Fine Art Prints
- Art Consultation for Your Home
- Design Tips for Styling Your Space with Art
- Limited Edition vs Open Edition Prints
- Collector Resources
- FAQ - Image Licensing
- License Stock Photos
- Stock Photo Price Request
- Materials and Sustainability
Photography Guides
Online Store Opens 24/7
Email:
Phone: +61 (0) 421 055 613

Crafted with care for the planet - using sustainable materials and eco-friendly packaging.
Ilya Genkin Photography acknowledges the Traditional Custodians of the land on which we operate, live and gather as employees, and recognise their continuing connection to land, water and community. We pay respect to Elders past, present and emerging.